RIT Tech Blog

株式会社RITのエンジニアが知見を共有する技術ブログです。

単一責任の原則を意識してリファクタしてみてよかったこと

エンジニアの前田です。

概要

単一責任の原則とクラス名を適切につけることを意識してリファクタしたので感想と疑似コードでのリファクタリング過程を共有します。

単一責任の原則とは

オブジェクト指向で用いられる五つの原則の頭字語である、SOLIDのうちSの部分です。
ざっくりと説明すると、一つのクラス・関数は、一つの明確な役割を持つべきだという原則になります。

責任を明確にしていないことによる弊害

単一責任の原則を意識する前は、一つのクラスに複数の役割を持たせてしまっていたり、クラス名とそのクラスの役割が違ってしまっていました。
その結果、クラスの使用方法を間違えてしまうなどの問題が起きてしまっていました。 例えば、リファクタ以前は以下のようなクラスが存在していたとします。(疑似コードなのでエディタにコピーしても動きません)

class 炭酸ジュースサービス {
  invoke() {
    return createJuice(); // ジュースを作る関数
  }
}

炭酸ジュースサービスなので、本来は炭酸ジュースに関することをしていないといけないのですが、実際はジュースを作成していました。
ただ、システム上の挙動は上手くいっていたのでなぜだろうと思い、調査をしたところ以下のようなクラスが別にありました。

class 炭酸ジュース
  async invoke() {
 const juice = createJuice(); // ジュースを作る関数
    await otherFunction(); // 炭酸ジュースを作る上で全く必要のないことをしている関数
    return createCarbonJuice(); 炭酸ジュースを作る関数
  }

リファクタ前のクラスをまとめると以下のようになります。

  • 炭酸ジュースサービス -> ジュースを作成するクラス

  • 炭酸ジュース -> 炭酸ジュースを作るクラス、ただし炭酸ジュースを作る上で全く必要のないことを実行している箇所がある

これだとクラス名を見て何をしているクラスかが分からないので困りますね。
例えば、炭酸ジュースサービスクラスという名前を見ただけでは、何をしているクラスなのかが分かりません。
また、炭酸ジュースクラスを使ったときに、炭酸ジュースを作ることができるのはいいものの、炭酸ジュースを作る上で全く必要のないことをしてしまっています。
それを意識していないままクラスを使ってしまうと、例えばそれがデータベースに何かを追加するような処理だった場合に、意図せずデータが書き換わってしまって後々不整合が起きてしまいます。

リファクタ後

正しい形にリファクタしなおしました。

  • Createジュースサービス -> ジュースを作成するクラス

  • Create炭酸ジュース -> 炭酸ジュースを作るクラス、ただし炭酸ジュースを作る上で全く必要のないことを実行している箇所は別の場所に移しました。

class Createジュース {
  invoke() {
    return createJuice(); // ジュースを作る関数
  }
}

class Create炭酸ジュース
  async invoke() {
 const juice = new Createジュース.invoke()
    return createCarbonJuice(juice); ジュースを引数にとって炭酸ジュースを作る関数
  }
}

以上がリファクタ後のクラスです。
まず、Createジュースクラスですが、クラス名を見ただけで何をするクラスなのかが分かりますね。
次に、Create炭酸ジュースクラスですが、クラス名を見ただけで何をするクラスなのかが分かる上に、炭酸ジュースを作る上で全く必要のないことを実行している箇所を排除したので、安全に使えるクラスになりました。

最後に

クラスの命名と役割の明確化は初期設計時にちゃんと決めておいた方がいいと思いました。

Prisma.js schemaファイルからER図を作成する

こんにちは!エンジニアの岸本です。

仕様設計を固める段階で「ER図を作成しよう!」ということになったものの、 既にBlitz.jsアプリケーション自体は存在している稀な状況だったので、「schemaファイルからそのままER図生成できるのでは?」という思考に至りました。調査したところ、prisma-erd-generatorというライブラリを発見したので使用方法と結果を報告します。

その前に..

GitHubmermaid記法を用いてMarkdownで図を書けるようになったこともあり、 mermaid記法でゴリゴリ自分で描きたい!という方はこちらの記事をどうぞ。 github.blog

手順1.

パッケージをインストール

npm i -D prisma-erd-generator @mermaid-js/mermaid-cli
# or
yarn add -D prisma-erd-generator @mermaid-js/mermaid-cli

手順2.

schema.prismaに下記を追記

generator erd {
  provider = "prisma-erd-generator"
}

任意の場所に生成したER図を保存する場合

generator erd {
  provider = "prisma-erd-generator"
  output = "../ERD.svg"
}

拡張子を指定

- svg (default: ./prisma/ERD.svg)
- png
- pdf
- md

手順3.

ターミナルから以下コマンドを叩く

npx prisma generate

テーマを選べる

以下それぞれのテーマを選択することで見た目をカスタマイズしてくれます

  • default (default)
  • forest
  • dark
  • neutral

結果

テーマはforestが個人的におすすめ

f:id:ryomaD:20220406145643p:plain

感想

今回、ER図作成した意図としては、ER図をチームで共有しながら認識のすり合わせのために利用したかったのですが、 構成テーブルが思いのほか多っかたので結局のところ、prisma-erd-generatorで出力したER図を参照しながら別のツールでER図を改めて作成しました。

しかし、初めてのER図作成だったためカーディナル(エンティティ間の関係を表す線)をprisma-erd-generatorで出力したER図を参考にしながら記述できたので助かりました。

おまけ

任意のタイミングでのみER図生成処理を行いたい場合、環境変数で以下を指定することで管理可能

DISABLE_ERD=true

npmmirror.com

Blitz.js 開発で実際に使った便利なQueryオプション

みなさん一度は「Blitz.js」というRailsにインスパイアされて作られたフルスタックReactフレームワークを聞いたことがあるのではないでしょうか。 触ったことがない方は是非触ってみてください。

https://blitzjs.com

本記事ではタイトルにあるように実際に使用したquery情報をまとめてみました。 また、Blitz.js は next + prismarailsのようにフルスタックなフレームワークを実現しているので、Blitzの理解のためにもprismaとnextを理解していると学習が捗ること間違いなしです。

ちなみにドキュメントにも以下の記載があるようにuseQueryはreact-queryを基に構築されているため、 自動キャッシュや、クエリ結果が古ければ再クエリを行うような機能も充実してます。

useQuery is built on react-query, so it automatically provides awesome features such as automatic caching and revalidation ※ 個人的にはキャッシュを有効活用することで表示パフォーマンスを上げれるのがreact-queryの1番のメリットだと感じている

補足として、それらの機能を利用する上でデフォルトの設定がされているクエリが複数存在しているため、想定外の結果になる場合はドキュメントに一度目を通して見ることをオススメします。

Out of the box, useQuery and the other query hooks are configured with aggressive but reasonable defaults. Sometimes these defaults can catch new users off guard or make learning/debugging difficult if they are unknown by the user.:

実際に使ったQueryオプション

refetchOnWindowFocus

  • 用途: window フォーカス時にデータが更新されてたらrefetchをしたい(true)・したくない時(false) window フォーカス時にrefetchをしたい(always) ※デフォルトはtrue

  • 使い方:

デフォルト
const [user] = useQuery(getUser, { where: { id: props.query.id } }, {refetchOnWindowFocus: true})

例1:
const [user] = useQuery(getUser, { where: { id: props.query.id } }, {refetchOnWindowFocus: false})

例2:
const [user] = useQuery(getUser, { where: { id: props.query.id } }, {refetchOnWindowFocus: "always"})
  • 実際に起きたケース

    • form入力を行うページで別タブへ移動した後、form入力画面へ戻ってきたらrefetchが発生してしまい、入力していた情報が消えてしまった。
  • 実際のコード

const [project] = useQuery(getProject, projectId, {
  refetchOnWindowFocus: false,
  refetchOnReconnect: false,
})

公式ドキュメントに以下の記載があるように、上記のようなケースを防ぐ場合はrefetchOnWindowFocusrefetchOnReconnectをoptionとして付与してあげる必要があるとのことでした。

Stale queries will automatically be refetched in the background when the browser window is refocused by the user or when the browser reconnects. You can disable this using the refetchOnWindowFocus and refetchOnReconnect options in queries.

enabled

  • 用途 クエリAが処理完了次第、クエリQueryBをトリガーしたい

  • 使い方

const [user] = useQuery(getUser, { where: { id: props.query.id } })
const [projects] = useQuery(getProjects, { where: { userId: user.id } }, { enabled: user }))
  • 実際に起きたケース

    • 処理Aが完了後に確定する結果によって任意のデータを取得したかった。
  • 実際のコード

const projects = useQuery(
    getProjects,
    {
      where: getProjectsWhereParams,
      orderBy: {
        projectNumber: 'asc',
      },
    },
    {
      enabled: !!getProjectsWhereParams,  ← 
      refetchOnWindowFocus: false,
      refetchInterval: false,
    },
  );

以上が実際に開発で使ったQueryオプション達でした。 上記以外にも有用そうなオプションをいくつか公式ドキュメントから紹介したいと思います。 blitzjs.com

retry

  • 用途: クエリの実行結果が失敗だったら再クエリしたい

  • 使い方:

const [user] = useQuery(getUser, { where: { id: props.query.id } }, {retry: true})

retryOnMount

  • 用途: falseに設定するとエラーが含まれている場合、クエリはマウント時に再試行されない。 ※デフォルトはtrue

  • 使い方:

const [user] = useQuery(getUser, { where: { id: props.query.id } }, {retryOnMount: false})

retryDelay

  • 用途: retryするタイミングをミリ秒単位で設定できる(遅らせることができる)

  • 使い方:

例1:
const [user] = useQuery(getUser, { where: { id: props.query.id } }, {retryDelay: 1000})

例2:
const [user] = useQuery(getUser, { where: { id: props.query.id } }, {retryDelay: attempt => Math.min(attempt > 1 ? 2 ** attempt * 1000 : 1000, 30 * 1000)})

cacheTime

  • 用途: クエリのキャッシュ保持時間を設定できる(キャッシュしたくない場合にミリ秒単位で時間を指定することでキャッシュを廃棄できる) Infinityを設定すると廃棄しない

  • 使い方:

例1:
const [user] = useQuery(getUser, { where: { id: props.query.id } }, {cacheTime:: 1000})

例2:
const [user] = useQuery(getUser, { where: { id: props.query.id } }, {cacheTime: Infinity})

refetchInterval

  • 用途: クエリをミリ秒単位で定期的に行える

  • 使い方:

例1:
const [user] = useQuery(getUser, { where: { id: props.query.id } }, {refetchInterval: 1000})

refetchIntervalInBackground

  • 用途: タブ/windowがバックグランド時にrefetchIntervalを行う

  • 使い方:

例1:
const [user] = useQuery(getUser, { where: { id: props.query.id } }, {refetchIntervalInBackground: true})

refetchOnMount

  • 用途: マウント時にデータが更新されてたらrefetchをしたい(true)・したくない時(false) マウント時にrefetchをしたい(always) ※デフォルトはtrue

  • 使い方:

デフォルト
const [user] = useQuery(getUser, { where: { id: props.query.id } }, {refetchOnMount: true})

例1:
const [user] = useQuery(getUser, { where: { id: props.query.id } }, {refetchOnMount: false})

例2:
const [user] = useQuery(getUser, { where: { id: props.query.id } }, {refetchOnMount: "always"})

refetchOnReconnect

  • 用途: データが古くなっている場合、再接続時にrefetchしたい(true)・したくない時(false) 再接続時にrefetchしたい(always) ※デフォルトはtrue

  • 使い方:

デフォルト
const [user] = useQuery(getUser, { where: { id: props.query.id } }, {refetchOnReconnect: true})

例1:
const [user] = useQuery(getUser, { where: { id: props.query.id } }, {refetchOnReconnect: false})

例2:
const [user] = useQuery(getUser, { where: { id: props.query.id } }, {refetchOnReconnect: "always"})

Google Geocoding APIとSQLの関数を使った構文で半径15km以内のユーザーを取得する

こんにちは!RITエンジニアの崎田です。

今回は、Google Geocoding APISQLの関数を使った構文で半径15km以内のユーザーを取得する方法について解説してみようと思います。

使用環境

使用API

作成済みのテーブル

前提としてユーザーがそれぞれ以下のテーブル情報(名前/住所/緯度/経度)を持っていることとします

カラム名
name string
address string
latitude float
longitude float

どのようにして半径15km以内のユーザーを取得するか?

球面三角法の余弦定理を用いて、探す際に基準とする住所の緯度経度と他のユーザーの住所の緯度経度から2点間の距離を算出した上で、15km以内の距離に該当する住所を持つユーザーをSQLで抽出します

球面三角法の余弦定理について

6371 * acos( sin(radians(a地点の緯度)) * sin(radians(b地点の緯度)) + cos(radians(a地点の緯度) * cos(radians(b地点の緯度)) * cos(radians(b地点の軽度) - radians(a地点の経度))

上記の式でa地点とb地点の距離を算出できます (※6371kmは地球のおおよその半径)

以下がUserモデルに記述した球面三角法の余弦定理を用いた半径15km以内のユーザーを取得するSQL文を含むスコープ

class Users < ApplicationRecord
  # 中略
  scope :within_15km, lambda { |lat, lng|
    query = "SELECT id, latitude, longitude, user_id,
               (
                 6371 * acos(
                   sin(radians(:lat)) * sin(radians(latitude))
                   +
                   cos(radians(:lat)) * cos(radians(latitude)) 
                   * cos(radians(longitude) - radians(:lng))
                 )
               ) AS distance
             FROM addresses HAVING distance <= 15 ORDER BY distance"
    User.find_by_sql([query, { lat: lat, lng: lng }])
  }
  # 中略
end


上で作成したスコープをUsersコントローラーで以下のように使用することで、指定した住所から半径15km以内のユーザー一覧を返すアクションを実装できます

注) GoogleのGeocoding APIAPIキー設定方法などに関しては割愛させていただきます。

  def index
    return area_search if params.key?(:area_name)

    users = User.all
    render json: users
  end

  # 中略

  def area_search
    # params[:area_name] には住所が入っている想定
    users = users_within_15km(params[:area_name])
    render json: users
  end

  # 中略

  # 住所をGeocoding APIのレスポンスに変換するメソッド
  def response_from_geocoding_api(address)
    escaped_address = CGI.escape(address)
    api_key = Rails.application.config.geocoding_api_key
    # APIを叩くためにgemとしてhttpartyを使用
    response = HTTParty.get("https://maps.googleapis.com/maps/api/geocode/json?address=#{escaped_address}&key=#{api_key}")
    raise StandardError, 'データの取得に失敗しました' unless response.code == 200

    response
  end

  # Geocoding APIのレスポンスのJSONをパースして緯度経度のハッシュにして返すメソッド
  def response_to_geocode(response_body)
    parsed_response = JSON.parse(response_body)
    raise StandardError, 'レスポンスのステータスがOKではありません' unless parsed_response['status'] == 'OK'

    latitude = parsed_response['results'][0]['geometry']['location']['lat']
    longitude = parsed_response['results'][0]['geometry']['location']['lng']
    { latitude: latitude, longitude: longitude }
  end

  # 引数の住所から半径15km以内のユーザーを返すメソッド
  def users_within_15km(address)
    # 同じ住所のレスポンスはキャッシュしておくことで無駄なAPIへのリクエストを減らす
    response_body = Rails.cache.fetch(address, expires_in: 1.day) do
      response = response_from_geocoding_api(address)
      response.body
    end
    geocode = response_to_geocode(response_body)
    User.within_15km(geocode[:latitude], geocode[:longitude])
  end


[参考にさせていただいたサイト]
大円距離 - Wikipedia
[MySQL]指定した緯度経度を中心に指定半径内のスポットデータを近い順に取得する(geometry型不使用編) - Qiita


以上が、Google Geocoding APISQLの関数を使った構文で半径15km以内のユーザーを取得する実装方法になります。

最後まで読んでいただきありがとうございました。

PagyとReact-Bootstrapでページネーションを実装する

こんにちは!RITエンジニアの崎田です。

今回は、Rails & Next.js環境下でのPagyとReact-BootstrapのPaginationコンポーネントを使用した、ページネーションの実装方法を解説していきたいと思います。

使用環境

  • Ruby on Rails (6.1.4.6)
  • Next.js (12.1.0)  ※使用言語はTypeScript

完成イメージ

ezgif-2-ebad878b0a31.gif (206.1 kB)

ページネーションの実装に入る前の準備

ページネーションの実装に入る前に、準備としてユーザー一覧表を作っておきます。

バックエンド側 (Ruby on Rails) の準備

RailsアプリをAPIモードで作成します。

rails new pagination-sample-api --api

Railsアプリ内のディレクトリに移動します

cd pagination-sample-api

③ ユーザーのコントローラーとモデルをscaffoldで一気に作成してマイグレーションします。

rails g scaffold user name:string
rails db:migrate

⑤ ユーザー100件分のシードデータを設定してDBに追加します。

# db/seeds.rb

100.times do |n|
  User.where(id: n + 1).first_or_create!(name: "test #{n + 1}")
end
rails db:seed

⑥ rack-corsを導入してCORSの設定します。

# Gemfile

gem 'rack-cors'
bundle
# config/initializers/cors.rb

Rails.application.config.middleware.insert_before 0, Rack::Cors do
  allow do
    origins 'localhost:8080'

    resource '*',
             headers: :any,
             methods: %i[get post put patch delete options head]
  end
end

⑦ users_controllerの不要なアクションなどは全て消しちゃいましょう。

# app/controllers/users_controller.rb

class UsersController < ApplicationController
  def index
    @users = User.all

    render json: @users
  end
end

rails sでサーバーを立ち上げてhttp://localhost:3000/usersにアクセスして以下のように100件分のユーザー情報が表示されたら成功です! スクリーンショット 2021-10-07 21.46.49.png (201.2 kB)

これでバックエンド側の準備ができました🎊


フロントエンド側 (Next.js) の準備

① Next.jsのプロジェクトをTypeScriptオプションで作成します。

yarn create next-app --typescript

② プロジェクト名の入力を求められるのでpagination-sample-clientと入力しましょう。 スクリーンショット 2021-10-07 21.42.33.png (30.2 kB)

③ Next.jsアプリのディレクトリに移動します

cd pagination-sample-client

yarn devでサーバーを立ち上げる際のポートを8080に設定します。

// package.json

{
  // 省略
  "scripts": {
    "dev": "next dev -p 8080",
    // 省略
  },
  // 省略
}

⑤ 実装に必要なパッケージをそれぞれ追加します。

yarn add bootstrap@5.1 
yarn add react-bootstrap
yarn add sass
yarn add axios

⑥ 表示部分を実装するために_app.tsxpages/index.tsxを以下の内容に書き換えます。

// pages/_app.tsx

import type { AppProps } from 'next/app';
import '../node_modules/bootstrap/scss/bootstrap.scss';

function MyApp({ Component, pageProps }: AppProps) {
    return <Component {...pageProps} />;
}
export default MyApp;
// pages/index.tsx

import type { NextPage } from 'next';
import Router from 'next/router';
import { useEffect } from 'react';

const Home: NextPage = () => {
    useEffect(() => {
        Router.push('/users');
    }, []);
    
    return null;
};

export default Home;

また、pages配下にusersフォルダを作成してその中にindex.tsxを作成して以下のように記述してください。

// pages/users/index.tsx

import type { NextPage } from 'next';
import React, { useEffect, useState } from 'react';
import axios, { AxiosRequestConfig, AxiosResponse } from 'axios';
import { Container, Table } from 'react-bootstrap';

class RestClient {
    async get<ResponseInterface>(
        path: string,
    ): Promise<AxiosResponse<ResponseInterface>> {
        return await axios.get<ResponseInterface>(path, this.requestConfig);
    }

    private get requestConfig(): AxiosRequestConfig {
        return {
            baseURL: 'http://localhost:3000',
            headers: {
                'Content-Type': 'application/json',
                Authorization: '',
            },
        };
    }
}

class User {
    constructor(
        public id: number,
        public name: string,
        public createdAt: Date,
        public updatedAt: Date,
    ) {}
}

interface UserResponseObject {
    id: number;
    name: string;
    created_at: string;
    updated_at: string;
}

const UsersIndex: NextPage = () => {
    const [users, setUsers] = useState<User[]>([]);

    const fetchData = async () => {
        const getNoAuthClient = () => new RestClient();
        const res = await getNoAuthClient().get<UserResponseObject[]>(
            `/users`,
        );
        const users = (res: UserResponseObject) =>
            new User(
                res.id,
                res.name,
                new Date(res.created_at),
                new Date(res.updated_at),
            );
        setUsers(res.data.map(users));
    };

    useEffect(() => {
        fetchData();
    }, []);

    const trs = users.map(user => {
        return (
            <tr key={user.id}>
                <td style={{ width: '5%' }}>{user.id}</td>
                <td>{user.name}</td>
            </tr>
        );
    });

    return (
        <Container className='mx-auto my-5'>
            <Table striped bordered hover>
                <thead>
                    <tr>
                        <th>ID</th>
                        <th>Name</th>
                    </tr>
                </thead>
                <tbody>{trs}</tbody>
            </Table>
        </Container>
    );
};

export default UsersIndex;

yarn devでサーバーを立ち上げてhttp://localhost:8080/usersにアクセスして以下の画面が表示されたら成功です!(100件目まで表示されます) スクリーンショット 2021-10-12 10.23.11.png (46.7 kB)

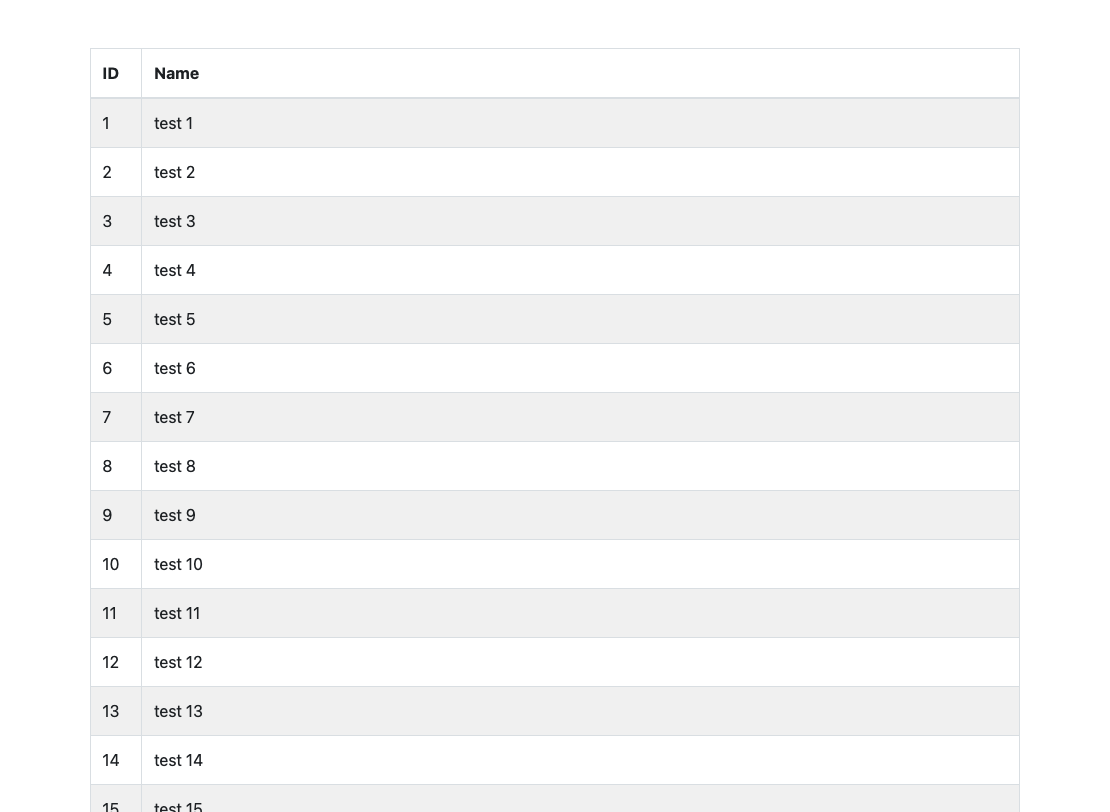
※もしエラーが表示されたらバックエンド側のサーバーがちゃんと立ち上がっているか確認してみてください。それでもエラーが出る場合は.nextフォルダを消してからサーバーを立ち上げ直してみてください。

これでフロントエンド側の準備もできました🎊


ユーザー一覧画面にページネーションを実装する

ここからが本題であるページネーションの実装になります。

① バックエンド(Ruby 0n Rails)側でPagyを用いてページごとにユーザー情報を返す処理を実装する

Pagyのgemを追加します。

# Gemfile

gem 'pagy'
bundle

configフォルダ内のinitializerフォルダにpagy.rbを作成して、以下のように10件ずつ返すように設定します。

# config/initializers/pagy.rb

Pagy::DEFAULT[:items] = 10

cors.rbでヘッダーに総ページ情報を含めるように設定します。

# config/initializers/cors.rb

Rails.application.config.middleware.insert_before 0, Rack::Cors do
  allow do
    origins 'localhost:8080'

    # ここから
    resource '*',
             headers: :any,
             methods: %i[get post put patch delete options head],
             expose: %w[Total-Pages]
    # ここまで
  end
end

users_controller.rbの内容をPagyによるユーザー情報と総ページ数を返す処理に変更します。

# app/controllers/users_controller.rb

class UsersController < ApplicationController
  # ここから
  include Pagy::Backend

  def index
    pagy, @users = pagy(User.all)
    response.headers['Total-Pages'] = pagy.pages

    render json: @users
  end
  # ここまで
end

② フロントエンド側(Next.js)でページごとにユーザー情報を取得する処理に変更する

以下のファイルを、ページごとにユーザー情報を取得をリクエストする処理に書き換えます。

// pages/users/index.tsx

// ここから
import type { NextPage, GetServerSideProps } from 'next';
// ここまで
import React, { useEffect, useState } from 'react';
import axios, { AxiosRequestConfig, AxiosResponse } from 'axios';
import { Container, Table } from 'react-bootstrap';

class RestClient {
    async get<ResponseInterface>(
        path: string,
    ): Promise<AxiosResponse<ResponseInterface>> {
        return await axios.get<ResponseInterface>(path, this.requestConfig);
    }

    private get requestConfig(): AxiosRequestConfig {
        return {
            baseURL: 'http://localhost:3000',
            headers: {
                'Content-Type': 'application/json',
                Authorization: '',
            },
        };
    }
}

class User {
    constructor(
        public id: number,
        public name: string,
        public createdAt: Date,
        public updatedAt: Date,
    ) {}
}

interface UserResponseObject {
    id: number;
    name: string;
    created_at: string;
    updated_at: string;
}

// ここから
interface Props {
    currentPage: number;
}

const UsersIndex: NextPage<Props> = ({ currentPage }) => {
    const [users, setUsers] = useState<User[]>([]);
    const [totalPages, setTotalPages] = useState<number>();

    const fetchData = async () => {
        const getNoAuthClient = () => new RestClient();
        const res = await getNoAuthClient().get<UserResponseObject[]>(
            `/users`,
        );
        const users = (res: UserResponseObject) =>
            new User(
                res.id,
                res.name,
                new Date(res.created_at),
                new Date(res.updated_at),
            );
        setUsers(res.data.map(users));
        setTotalPages(Number(res.headers['total-pages']));
    };

    useEffect(() => {
        fetchData();
    }, [currentPage]);
    
    if (!totalPages) return null;

    const trs = users.map(user => {
        return (
            <tr key={user.id}>
                <td style={{ width: '5%' }}>{user.id}</td>
                <td>{user.name}</td>
            </tr>
        );
    });

    return (
        <Container className='mx-auto my-5'>
            <Table striped bordered hover>
                <thead>
                    <tr>
                        <th>ID</th>
                        <th>Name</th>
                    </tr>
                </thead>
                <tbody>{trs}</tbody>
            </Table>
        </Container>
    );
};

export const getServerSideProps: GetServerSideProps = async ctx => {
    const currentPage = Number(ctx.query.page) || 1;
    return { props: { currentPage } };
};
// ここまで

export default UsersIndex;

③ フロントエンド側(Next.js)でReact-BootstrapのPaginationコンポーネントを用いてページネーション部分の処理をまとめたコンポーネントを作成する

トップの階層にcomponentsフォルダを作成します。その中にページネーションのコンポーネントファイルをPaginationParts.tsxという名前で作成して以下のように記述します。

// components/PaginationParts.tsx

import React from 'react';
import { Pagination } from 'react-bootstrap';
import Router from 'next/router';

interface Props {
    // 総ページ数
    totalPages: number;
    // 現在のページ
    currentPage: number;
    // 遷移先のクエリに渡すページ数以外の文字列
    targetPagePath: string;
}

// ページネーションの数字ボタンの数
const totalPageIndications = 5;
// ページネーションの数字ボタンの真ん中の位置 (例: 5の場合は3, 10の場合は6)
const middlePagePosition = Math.floor(totalPageIndications / 2) + 1;

export const PaginationParts: React.FC<Props> = ({totalPages,currentPage,targetPagePath}) => {
    const totalItems =
        totalPages > totalPageIndications
            ? [...Array(totalPageIndications)]
            : [...Array(totalPages)];
    const paginationItems = totalItems.map((e, key) => {
        const pageNumber = key + 1;
        const pageNumberAroundMiddlePage =
            pageNumber + currentPage - middlePagePosition;
        const pageNumberUpToLastPage =
            pageNumber + totalPages - totalPageIndications;
        if (
            currentPage <= middlePagePosition ||
            totalPages <= totalPageIndications
        ) {
            return (
                <Pagination.Item
                    key={pageNumber}
                    onClick={() =>
                        Router.push(targetPagePath + pageNumber)
                    }
                    active={pageNumber === currentPage}
                    className='mx-1'
                >
                    {pageNumber}
                </Pagination.Item>
            );
        } else if (
            currentPage + middlePagePosition - 1 >
            totalPages
        ) {
            return (
                <Pagination.Item
                    key={pageNumberUpToLastPage}
                    onClick={() =>
                        Router.push(
                            targetPagePath + pageNumberUpToLastPage,
                        )
                    }
                    active={pageNumberUpToLastPage === currentPage}
                    className='mx-1'
                >
                    {pageNumberUpToLastPage}
                </Pagination.Item>
            );
        } else {
            return (
                <Pagination.Item
                    key={pageNumberAroundMiddlePage}
                    onClick={() =>
                        Router.push(
                            targetPagePath + pageNumberAroundMiddlePage,
                        )
                    }
                    active={pageNumberAroundMiddlePage === currentPage}
                    className='mx-1'
                >
                    {pageNumberAroundMiddlePage}
                </Pagination.Item>
            );
        }
    });

    return (
        <Pagination className='align-items-center'>
            <Pagination.First
                onClick={() =>
                    Router.push(targetPagePath + 1)
                }
                className='mx-1'
                disabled={currentPage === 1}
            />
            <Pagination.Prev
                onClick={() =>
                    Router.push(targetPagePath + (currentPage - 1))
                }
                className='mx-1'
                disabled={currentPage === 1}
            />
            {paginationItems}
            <Pagination.Next
                onClick={() =>
                    Router.push(targetPagePath + (currentPage + 1))
                }
                className='mx-1'
                disabled={currentPage === totalPages}
            />
            <Pagination.Last
                onClick={() =>
                    Router.push(targetPagePath + totalPages)
                }
                className='mx-1'
                disabled={currentPage === totalPages}
            />
        </Pagination>
    );
};


★ 今回作成したPaginationPartsコンポーネントの内容について説明する前に、React-Bootstrapが用意しているページネーション用のコンポーネントについてそれぞれ簡単に説明していきたいと思います。

Pagination
全てのページネーションコンポーネントをこのコンポーネントでラップします。

Pagination.First, Pagination.Prev, Pagination.Next, Pagination.Last
それぞれ最初のページ・前のページ・次のページ・最後のページに遷移するボタンとして使用するコンポーネントです。 disableプロップスがtrueだと無効表示になります。 hrefプロップスやonClickプロップスで遷移先を設定します。

Pagination.Item
ページ番号を表示してそのページに遷移するボタンとして使用するコンポーネントです。 activeプロップスがtrueだとハイライト表示になります。 上のコンポーネントと同様にhrefプロップスやonClickプロップスで遷移先を設定します。

参考: https://react-bootstrap.github.io/components/pagination/  

Pagination.Itemの表示方法ですが、ロジックが少しわかりにくいので実際に表示する部分を箱に例えて説明します。

ブログ用図解 pagination sample.002.png (326.0 kB)


まず以下の3つの箱を用意して、条件によって表示を出し分けるようにします。
  1. 最初の方のページボタン群を表示する箱
  2. 最後の方のページボタン群を表示する箱
  3. 中間のページボタン群を表示する箱  


『1』の箱については、『現在のページが箱の真ん中の位置*以下、もしくは総ページ数が箱のボタンの総数以下の場合』に表示します。

実際に表示されるのは最初のページのボタンから箱の最後のページのボタン(または最後のページのボタン)までになります。

※「箱の真ん中の位置」というのはボタンの総数(今回の場合は5)から見て真ん中という意味なので3になります ブログ用図解 pagination sample.004.png (65.0 kB)

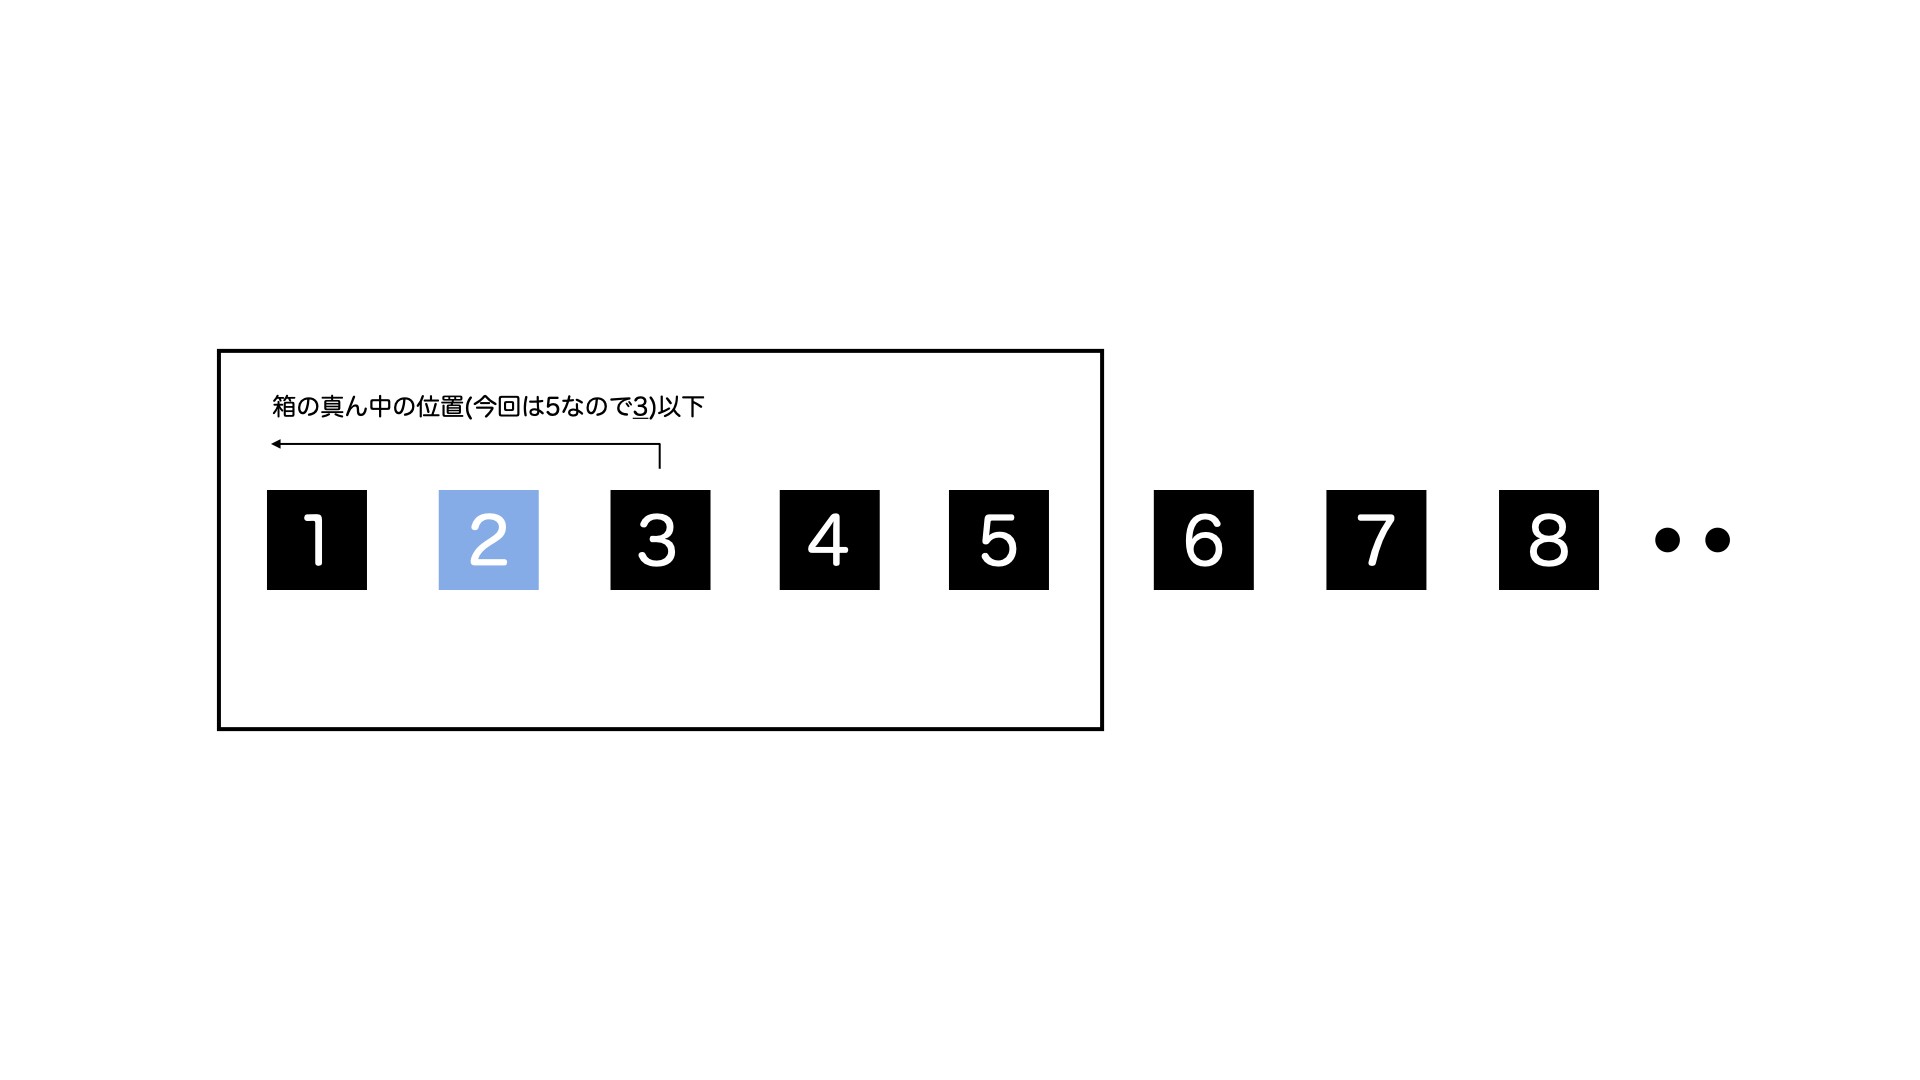
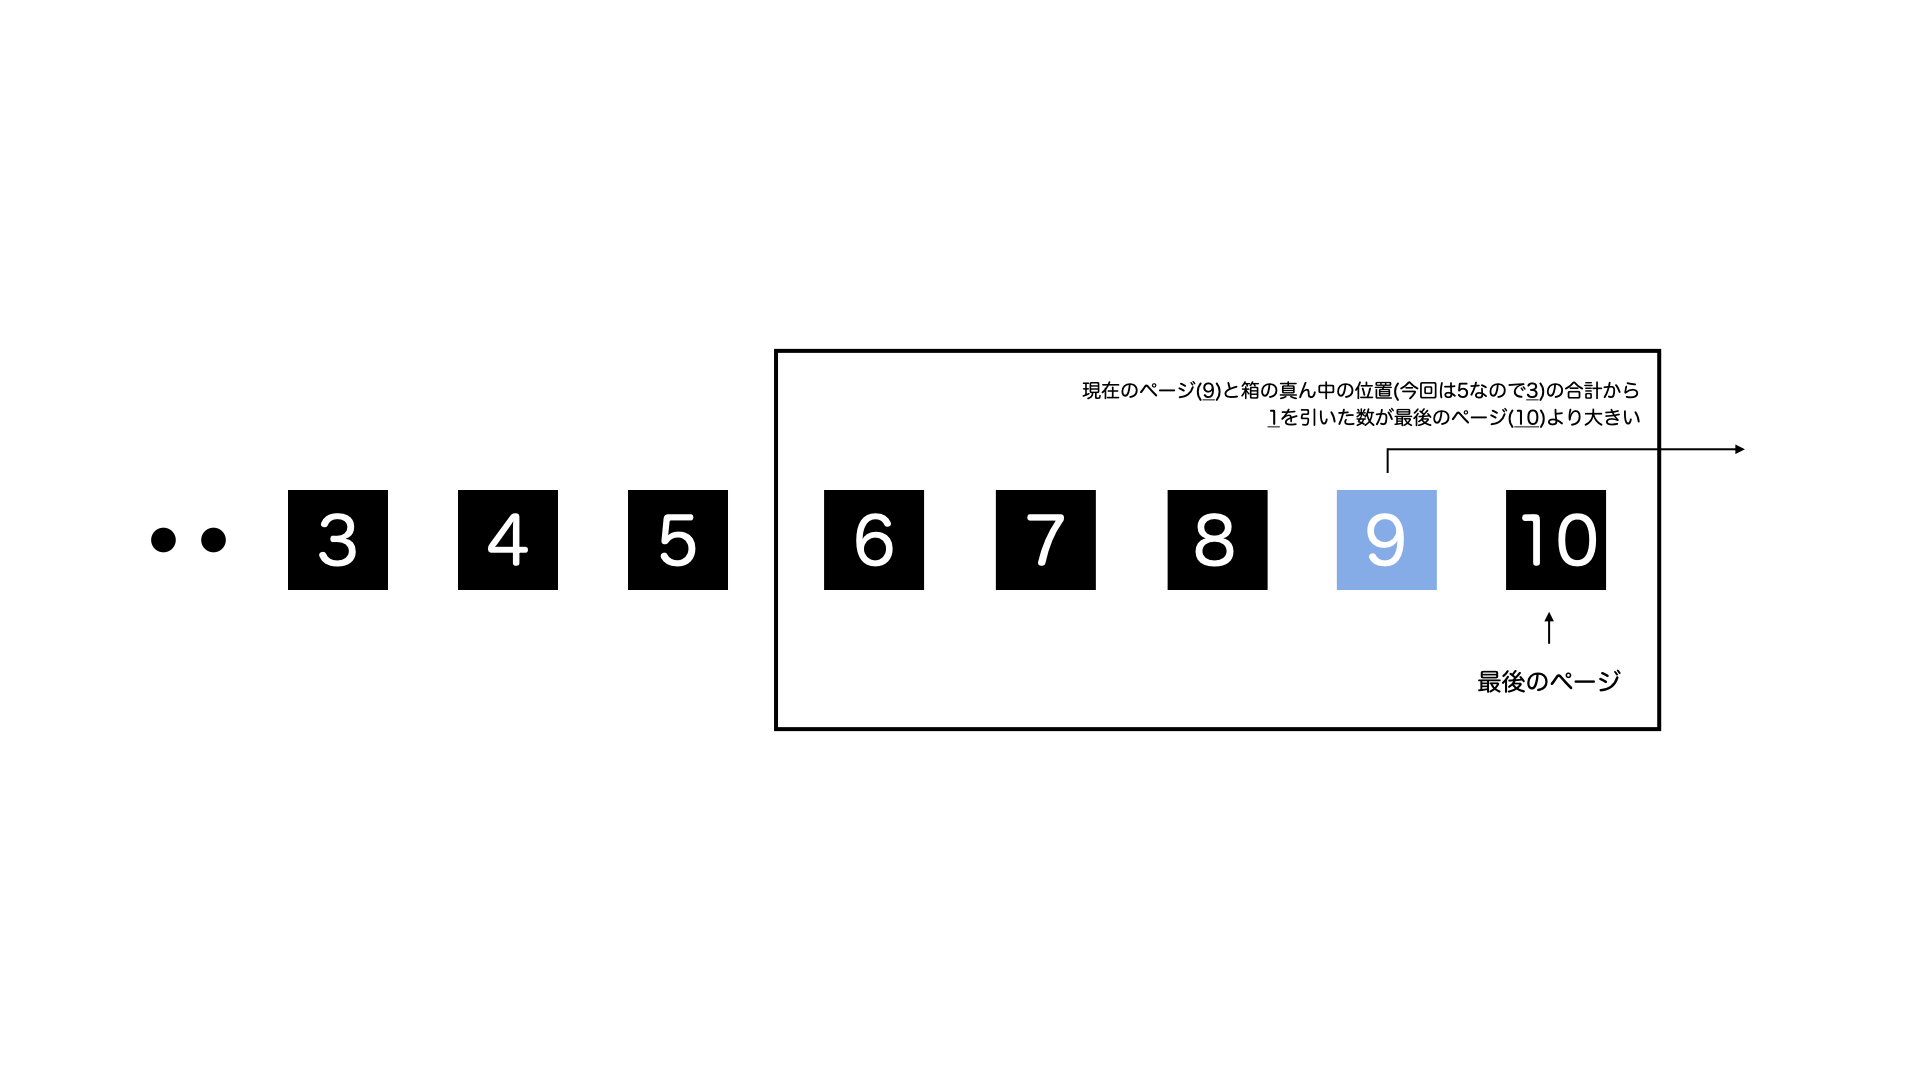
『2』の箱については、『現在のページと箱の真ん中の位置の合計から1引いた数が総ページ数より大きい場合』に表示します。

実際に表示されるのは最後のページに1を足した数から箱のボタンの総数を引いたページのボタンから最後のページのボタンまでになります。 ブログ用図解 pagination sample.005.png (82.4 kB)

『3』の箱については、1, 2のどちらでもない場合に表示します。

実際に表示されるのは現在のページから箱の真ん中の位置を引いた数のボタンの次のボタン(ややこしいので下の図を参考にして下さい)から箱の最後のページのボタンまでになります。3の箱の条件内でページが切り替わる場合は、現在のページのボタンを常に真ん中に表示したまま箱自体が動いていくような感じになります。 ブログ用図解 pagination sample.006.png (118.9 kB)

これら3つの箱を現在のページの位置に応じて表示を分けています。

※ 今回の場合だと1〜3ページ目は『1』の箱、4〜8ページ目は『3』の箱、9〜10ページ目は『2』の箱で表示しています。

④ 最後にユーザー一覧画面の下部にページネーションの処理をまとめたPaginationPartsコンポーネントを設置する

pages配下のusersフォルダ内のindex.tsxを以下の内容に変更します。

// pages/users/index.tsx

import type { NextPage, GetServerSideProps } from 'next';
import React, { useEffect, useState } from 'react';
// ここから
import { PaginationParts } from '../../components/PaginationParts';
// ここまで
import axios, { AxiosRequestConfig, AxiosResponse } from 'axios';
import { Container, Table } from 'react-bootstrap';

class RestClient {
    async get<ResponseInterface>(
        path: string,
    ): Promise<AxiosResponse<ResponseInterface>> {
        return await axios.get<ResponseInterface>(path, this.requestConfig);
    }

    private get requestConfig(): AxiosRequestConfig {
        return {
            baseURL: 'http://localhost:3000',
            headers: {
                'Content-Type': 'application/json',
                Authorization: '',
            },
        };
    }
}

class User {
    constructor(
        public id: number,
        public name: string,
        public createdAt: Date,
        public updatedAt: Date,
    ) {}
}

interface UserResponseObject {
    id: number;
    name: string;
    created_at: string;
    updated_at: string;
}

interface Props {
    currentPage: number;
}

const UsersIndex: NextPage<Props> = ({ currentPage }) => {
    const [users, setUsers] = useState<User[]>([]);
    const [totalPages, setTotalPages] = useState<number>();


    const fetchData = async () => {
        const getNoAuthClient = () => new RestClient();
        const res = await getNoAuthClient().get<UserResponseObject[]>(
            `/users`,
        );
        const users = (res: UserResponseObject) =>
            new User(
                res.id,
                res.name,
                new Date(res.created_at),
                new Date(res.updated_at),
            );
        setUsers(res.data.map(users));
        setTotalPages(Number(res.headers['total-pages']));
    };

    useEffect(() => {
        fetchData();
    }, [currentPage]);
    
    if (!totalPages) return null;

    const trs = users.map(user => {
        return (
            <tr key={user.id}>
                <td style={{ width: '5%' }}>{user.id}</td>
                <td>{user.name}</td>
            </tr>
        );
    });

    return (
        <Container className='mx-auto my-5'>
            <Table striped bordered hover>
                <thead>
                    <tr>
                        <th>ID</th>
                        <th>Name</th>
                    </tr>
                </thead>
                <tbody>{trs}</tbody>
            </Table>
            {/* ここから */}
            <Container className='d-flex justify-content-center mt-5'>
                <PaginationParts
                    totalPages={totalPages}
                    currentPage={currentPage}
                    targetPagePath={`?page=`}
                />
            </Container>
            {/* ここまで */}
        </Container>
    );
};

export const getServerSideProps: GetServerSideProps = async ctx => {
    const currentPage = Number(ctx.query.page) || 1;
    return { props: { currentPage } };
};

export default UsersIndex;

これで全てのページネーションの実装ができました!

PaginationPartsコンポーネントの各プロップスに、『総ページ数』と『現在のページ』と『遷移先のパスのクエリに渡すページ数以外の文字列』がそれぞれ設定されているのがわかると思います。

終わりに

長くなってしまいましたが、以上がPagyとReact-Bootstrapを使ったページネーションの実装方法になります。

最後までご覧いただきありがとうございました!🙇‍♂️

Blitz.js v0.45 リリースノート和訳

v0.45.3でリモートコード実行の脆弱性が修正されているので、必ずバージョンアップを・・・

Blitz.js v0.45.3

github.com

🚨 致命的なセキュリティ脆弱性の修正

🐞 修正

  • FORCE_COLOR=0でログの色を消せるように: #3157

👩‍🍳 レシピ

  • NextUI レシピの追加: #3152
続きを読む

React BootstrapのAccordionで複数のAccordion Collapseを同時に開閉するボタンを作る

こんにちは。RITの関です。

React BootstrapのAccordion.Collapseを同時に開閉するボタンを作るという実装に少し苦労したので、その方法を紹介します。

※この記事はreact-bootstrap 1.6版の実装方法です。2.~版はアコーディオン周りの仕組みが異なっているためこの記事は参考にしないでください。

完成イメージ

完成イメージ
完成イメージ

まずはシンプルなAccordionを作る

test_table.tsx

import { TestList } from '@/Presentation/Component/Home/TestList';
import { NextPage } from 'next';
import React from 'react';

const TestTable: NextPage = () => {
    return (
        <div>
            <div className='mb-4 d-flex align-items-center justify-content-between'>
                <p className='mb-0 font-weight-bold'>アコーディオン一覧</p>
            </div>
            <div>
                {[
                    'accordionTextあああああ',
                    'accordionTextいいいいい',
                    'accordionTextううううう',
                ].map((text, index) => (
                    <div key={index}>
                        <TestList
                            eventKey={index.toString()}
                            accordionText={text}
                        />
                    </div>
                ))}
            </div>
        </div>
    );
};

export default TestTable;

test_list.tsx

import React, { FunctionComponent } from 'react';
import { ListGroup, Button, Accordion, Card } from 'react-bootstrap';

interface Props {
    eventKey: string;
    accordionText: string;
}

export const TestList: FunctionComponent<Props> = props => {
    return (
        <Accordion>
            <Card className='border-0 rounded-0'>
                <Accordion.Toggle as={Button} eventKey={props.eventKey}>
                    <div className='d-flex justify-content-between align-items-center'>
                        {props.accordionText}
                    </div>
                </Accordion.Toggle>
                <Accordion.Collapse eventKey={props.eventKey}>
                    <ListGroup>
                        <p>リストの中身だよ</p>
                    </ListGroup>
                </Accordion.Collapse>
            </Card>
        </Accordion>
    );
};

React Bootstrapのチュートリアルに書いてあるようなシンプルなアコーディオンを作成しました。

簡易アコーディオン
簡易アコーディオン

諸々編集する

次は、諸々更新したtest_tableをまとめて載せます。大きくやったことは下記です。

①openというstateの追加
AccordionOpenという型定義を追加して、openというstateを追加しました。
openの中身は全てを開くか全てを閉じるか判断するisOpenと、ボタンを2回以上連続クリックしても反応してくれるようにtimestampを入れています。
もしtimestampを入れない場合、isOpenの値が変化しないことから、全てを開くボタンが動作してくれなくなります。

②test_listへ渡すpropsにopenを追加
test_listがopenを受け取れるようにして、受け取ったpropsによって全アコーディオンを開閉するようにしています。

③test_list自体にisShowというstateを追加して、Accordion自体をisShowを元に開閉するように変更
Accordion activeKey={isShow ? props.eventKey : ''}と定義することで、isShow: trueのときはactiveKeyとprops.eventKeyが同じ値になるので開く、isShow: falseのときはactiveKeyとprops.eventKeyが異なる値になるので閉じるようになります。
この開閉の仕組自体はreact-bootstrap自体によるものなので、詳細は調べてみてください。

④test_listにuseEffectを追加
test_listにuseEffectを追加して、props.openが変わるごとにisShowの値をprops.openと同じにするようにしています。
これによって、全てを開くボタンを押した時に、openの値がtrueになる→test_listのisShowもtrueになる→アコーディオンが開くという処理ができるようになります!

test_table.tsx

export interface AccordionOpen {
    isOpen: boolean;
    timestamp: number;
}

const TestTable: NextPage = () => {
    const [open, setOpen] = useState<AccordionOpen>({
        isOpen: true,
        timestamp: new Date().getTime(),
    });

    return (
        <div>
            <div className='mb-4 d-flex align-items-center justify-content-between'>
                <p className='mb-0 font-weight-bold'>コンタクト一覧</p>
                <div>
                    <Button
                        variant='outline-primary mr-3'
                        onClick={() =>
                            setOpen({
                                isOpen: true,
                                timestamp: new Date().getTime(),
                            })
                        }
                    >
                        すべてを表示
                    </Button>
                    <Button
                        variant='outline-primary'
                        onClick={() =>
                            setOpen({
                                isOpen: false,
                                timestamp: new Date().getTime(),
                            })
                        }
                    >
                        すべてを閉じる
                    </Button>
                </div>
            </div>
            <div>
                {[
                    'accordionTextあああああ',
                    'accordionTextいいいいい',
                    'accordionTextううううう',
                ].map((text, index) => (
                    <div key={index}>
                        <TestList
                            eventKey={index.toString()}
                            accordionText={text}
                            open={open}
                        />
                    </div>
                ))}
            </div>
        </div>
    );
};

export default TestTable;

test_list.tsx

interface Props {
    eventKey: string;
    accordionText: string;
    open: AccordionOpen;
}

export const TestList: FunctionComponent<Props> = props => {
    const [isShow, setIsShow] = useState(true);

    useEffect(() => {
        setIsShow(props.open.isOpen);
    }, [props.open]);

    return (
        <Accordion activeKey={isShow ? props.eventKey : ''}>
            <Card className='border-0 rounded-0'>
                <Accordion.Toggle
                    as={Button}
                    eventKey={props.eventKey}
                    className='px-4 py-2 text-left'
                    onClick={() => {
                        setIsShow(!isShow);
                    }}
                >
                    <div className='d-flex justify-content-between align-items-center'>
                        {props.accordionText}
                    </div>
                </Accordion.Toggle>
                <Accordion.Collapse eventKey={props.eventKey}>
                    <ListGroup>
                        <p>リストの中身だよ</p>
                    </ListGroup>
                </Accordion.Collapse>
            </Card>
        </Accordion>
    );
};

最後に動きのイメージを貼って終わりにします。react-bootstrapを使うときの役に立てると幸いです。ありがとうございました!

完成イメージ

完成イメージ
完成イメージ